

Hey there, if you’ve landed here, chances are you’re gearing up to install a Cone Blender Mixer (you can check out our full lineup right here: Cone Blender Mixer) and you’re not exactly sure where to start—no worries, I’ve worked with dozens of clients from food processing to pharma over the last 10 years as part of the team supplying these blenders, so I’ve seen every misstep (and every smooth install) there is. A lot of folks skip the prep work and end up with a mixer that doesn’t blend right, or worse, has safety issues. Let’s break this down step by step, keep it real, no fancy jargon that makes your eyes cross.
First off, a quick heads up: this guide works for our standard industrial models, but if you’ve got a specific type, like the Food Double Cone Mixer for consumables, there are extra food safety checks I’ll call out later. Also, if you’re using it for mixing bulk solids like grains or fine powders, the Cone Blender Mixing Powder and Grain page has model-specific specs you’ll want to cross-reference before you even unbox it.
Alright, let’s start with what you need before you touch the mixer. You’d be shocked how many people show up to the site, unbox the unit, and realize they don’t have the right space or power. First, measure the install area. These blenders aren’t tiny—they need clearance on all sides: 2-3 feet around the unit for maintenance (you’ll need to reach the drive motor and inspection ports) and at least 4 feet above the top loading port if you’re using a forklift to hopper in materials. I once had a client who crammed a double cone blender into a 10x10 space and had to tear out a wall a week later—save yourself the headache. Next, check utilities. Our mixers run on 3-phase power (99% of industrial settings do, but double-check the label on your unit) and need a grounded circuit—no extension cords, ever. If it’s a food-grade model, you’ll also need to make sure the area has a drain for washdowns, since those units are designed to be cleaned on-site.
Now, unboxing and pre-inspection. Don’t just toss the box and go—lay all the parts out on a flat, stable surface (a pallet works great) and cross-check against the packing list. You should have the main blender shell, drive motor, gearbox, coupling, support legs, loading chute, discharge valve, and all the bolts/gaskets. If something’s missing or looks damaged (dents in the shell, loose bolts in the motor), call us immediately—we ship with tracking, so it’s usually a shipping issue, not a manufacturing one. Pro tip: take photos of everything before you start assembling, just in case you misplace a part later.
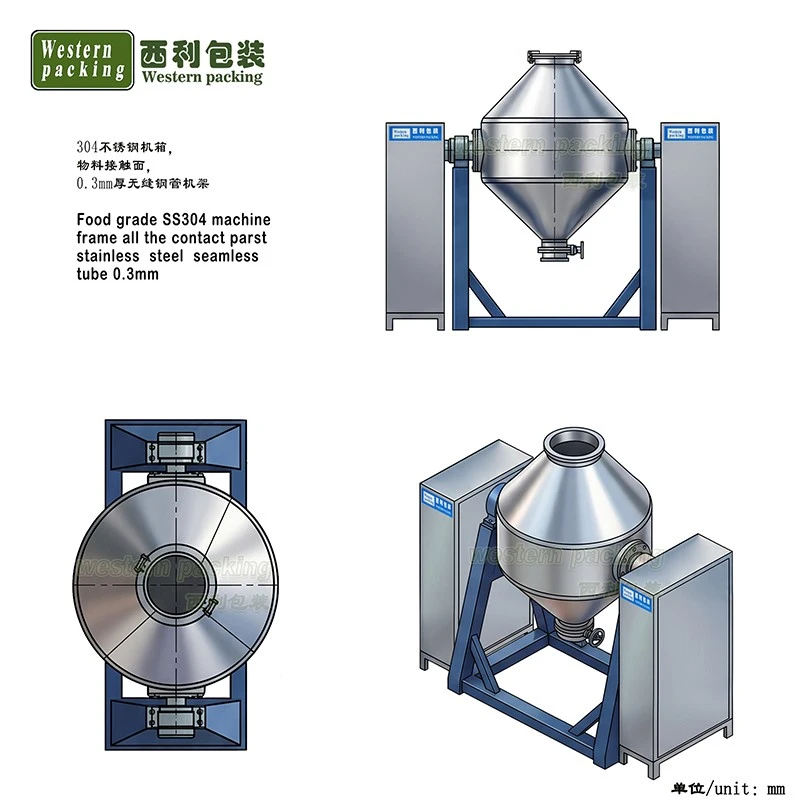
Next up, assembling the base and support structure. This is the part that keeps the blender from wobbling during operation, so don’t cut corners. First, level the floor with a spirit level (use a long 4-foot level, not a tiny one) — if the floor’s off by even 1 degree, the blender will lean, and your mixture will end up lopsided. Once the floor’s level, bolt the support legs to the floor using anchor bolts (we include these, but make sure you use the right size for your floor—concrete needs heavy-duty anchors, wood frame needs lag bolts). Then, attach the main shell to the support legs—align the mounting holes slowly, don’t force them. If you’re working with a Mixing Double Cone Blender, the shell has two halves, so you’ll need to tighten the clamping bolts evenly in a crisscross pattern (like you’d tighten a car tire) to avoid warping the seal between the halves. If you skip that, you’ll get leaks when blending, which is a pain for clean-up and product loss.
Now, connecting the drive system. This is the heart of the blender, so get this right. First, attach the gearbox to the motor, then mount them to the back of the support frame—make sure the shaft of the motor lines up perfectly with the shaft of the blender’s drive hub. Misalignment here is the #1 cause of motor burnout, and it’s 100% preventable. We use a flexible coupling that lets a tiny bit of give, but if you can see a gap of more than 1/32 of an inch between the two shafts, loosen the motor bolts and adjust it slowly. Once it’s lined up, tighten all the motor and gearbox bolts, then double-check with a dial indicator if you have one (many small shops don’t, so a quick visual and a light tap on the shafts—they shouldn’t wobble—works too). Next, wire the motor. Always turn off the main power before wiring—no exceptions. Follow the wiring diagram that comes with the unit, and make sure the ground wire is connected properly. If you’re not comfortable wiring, hire a licensed electrician—even a small mistake here can fry the motor or cause a shock hazard.
Here’s the part that’s specific to getting good blends: adjusting the rotation speed and discharge valve. Most of our cone blenders run at 15-25 RPM, but the exact speed depends on what you’re mixing. For fine powders, a faster speed (20-25 RPM) works better; for larger grains or delicate materials, slow it down to 15-20 RPM so you don’t break the grains. To adjust the speed, check if your blender has a variable frequency drive (VFD)—if it does, you can tweak it right on the control panel. If not, you may need to swap pulleys (our tech team can walk you through that over the phone). The discharge valve is another big one—if it’s not sealing tight, you’ll lose product when blending. Close the valve, run the blender empty for 1 minute, then check for leaks. If there’s a gap, loosen the bolts on the valve housing, adjust the position, and retighten—don’t over-tighten, that can warp the valve.
Wait, if you’re working with a food-grade unit (the Food Double Cone Mixer), there are a couple extra checks here. First, make sure all the gaskets are food-grade silicone, not regular rubber—regular rubber can leach chemicals into food. Second, test the cleaning process: use warm water and a mild food-safe detergent, run the blender empty for 5 minutes, then flush it with clean water and check for residue. We include a food safety checklist with these units, so don’t skip that step.
Now, the test run. This is non-negotiable—you can’t just load up product and go. First, run the blender empty for 10 minutes. Listen for weird noises: grinding, rattling, or high-pitched squeals. Rattling usually means loose bolts—go around and tighten every bolt (motor, legs, valve) again. Squealing is usually a misaligned belt or coupling—shut it off and adjust that right away. After the empty run, do a test blend with a small batch of a similar material to what you’ll be using. For example, if you’re blending flour, use a 50-pound batch of flour and some food coloring (easy to see if it’s mixed evenly). Run it for 15 minutes, then open the discharge valve and take samples from the top, middle, and bottom of the mixture. If the color is uniform across all samples, you’re good. If not, adjust the rotation speed (slower for more delicate mixes, faster for fine powders) or add 5 extra minutes of blending time.
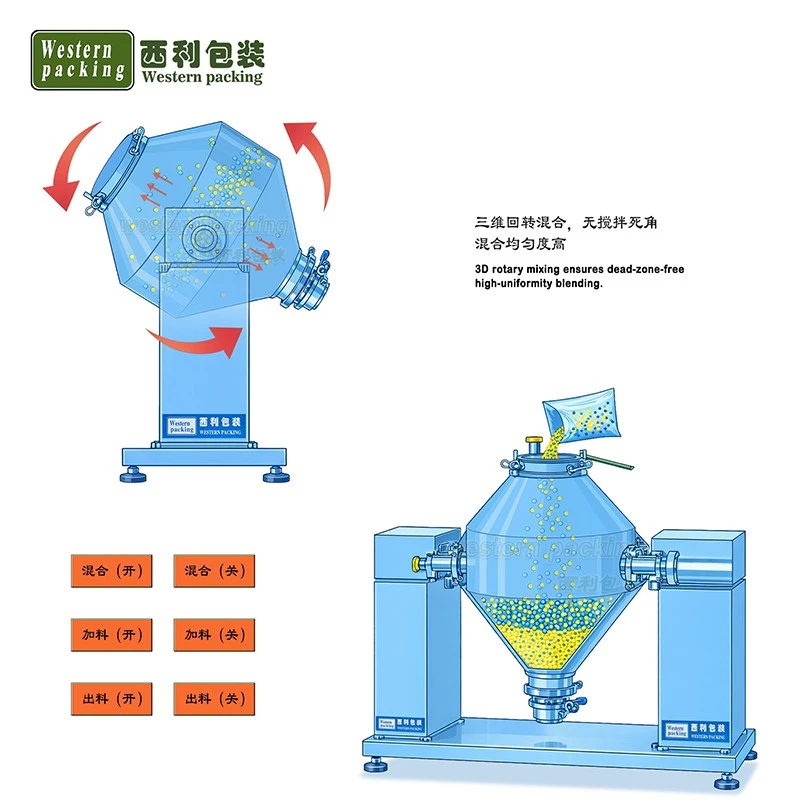
A few quick pro tips I’ve picked up over the years: don’t overload the blender—max fill is 70% of the total volume, any more and material will get stuck in the top cone and not mix. If you’re blending a mix of fine and coarse materials, add the fine stuff first, then the coarse—this helps with even distribution. And for maintenance, lubricate the gearbox every 3 months (we use a high-temperature lithium grease) and check the gaskets monthly for tears, especially if you use the blender heavily.
Wait, if you’re still unsure about any step—like aligning the drive or adjusting the speed—our team is here to help. We don’t just sell you a mixer and ghost you; we have 24/7 support for all our products, including the Cone Blender Mixer, Mixing Double Cone Blender, and the specialty units for food or grain. Whether you need a quick walkthrough over the phone or a video call to walk through the install, we’re happy to help.
If you’re ready to get your Cone Blender Mixer installed and up and running, or if you have questions about which model is right for your needs, reach out to our sales team to talk pricing, lead times, or custom specs. We work with small local shops and large manufacturing facilities, so we can tailor a solution to your needs.
References
- Industrial Mixer Installation Best Practices: Powder Technology Association of America, 2021
- Food-Grade Mixer Safety and Sanitation Guidelines: Food and Drug Administration (FDA), 2022
- Cone Blender Operation and Maintenance Manual: Author’s Internal Product Documentation, 2023
- Misalignment Effects on Industrial Drive Systems: Mechanical Engineering Magazine, Vol. 95, No. 4, 2020